Blower door testing has become a non-negotiable part of UK construction compliance. With Part L airtightness requirements now applying to all new dwellings, builders and contractors need to understand what the test involves, when to schedule it, and how to avoid the most common failures. This guide covers the practical details.
What a Blower Door Test Actually Measures
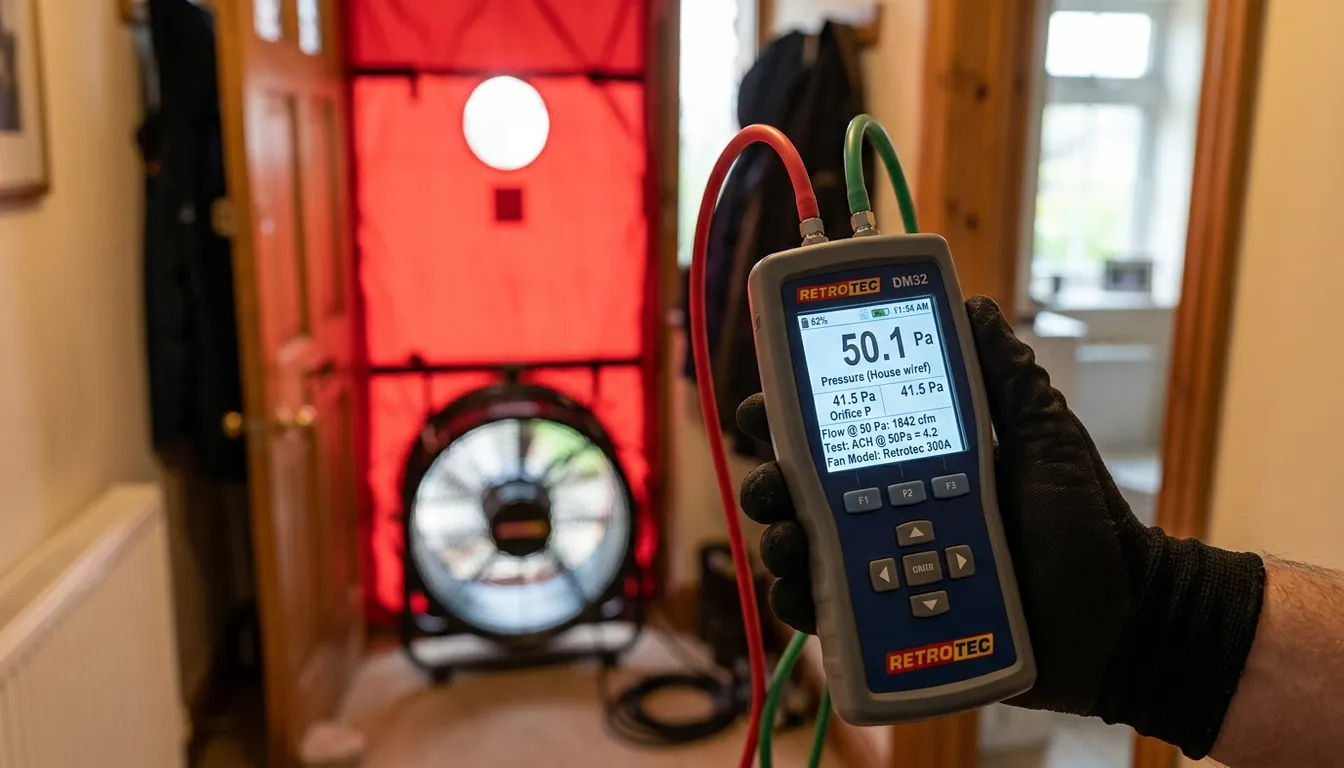
A blower door test measures how airtight a building is. A calibrated fan is temporarily sealed into an external doorway and used to depressurise (or pressurise) the building to 50 Pascals. The fan speed required to maintain that pressure difference tells you exactly how much air is leaking through the building envelope.
The result is expressed as air changes per hour at 50 Pascals (ACH50) or as cubic metres per hour per square metre of envelope area (m³/h/m²). The lower the number, the tighter the building. In the UK, results for Building Regulations compliance are reported in m³/h/m² at 50 Pa.
Part L Airtightness Requirements
Under Approved Document L (Conservation of fuel and power), all new dwellings must demonstrate airtightness through testing. The key requirements are:
- Maximum air permeability: 8 m³/h/m² at 50 Pa for a dwelling to pass. However, the design air permeability used in SAP calculations is often much lower, and the as-built result must match or beat the design figure.
- Testing is mandatory: Every new dwelling must be tested. There is no sampling regime for smaller developments. Each plot needs its own test result.
- Approved tester: Testing must be carried out by a person registered with an approved scheme, such as ATTMA (Air Tightness Testing and Measurement Association) or iMist.
- Standard: Tests must follow the procedure set out in CIBSE TM23 or BS EN ISO 9972.
If the as-built air permeability is worse than the design value used in the SAP calculation, the building will not comply. This can mean reworking the SAP assessment with a higher (worse) air permeability figure, which may push the dwelling below the Target Emission Rate or Target Fabric Energy Efficiency. In practice, that usually means remediation and retesting.
How the Test Works: Step by Step
The test itself is straightforward, but preparation matters. Here is what happens on test day:
- Sealing intentional openings: The tester temporarily seals all intentional ventilation paths: trickle vents, extract fans, flues, and any passive vents. The goal is to measure uncontrolled air leakage only.
- Fan installation: A calibrated fan and adjustable panel are fitted into an external door frame. Pressure gauges and flow meters are connected.
- Depressurisation and pressurisation: The fan draws air out of the building (depressurisation) and then pushes air in (pressurisation), taking readings at multiple pressure points between 10 Pa and 60 Pa.
- Data recording: The tester records airflow at each pressure increment. Software calculates the air permeability at 50 Pa from this data.
- Reporting: An official test certificate is produced, showing the result in m³/h/m² at 50 Pa, along with building details, weather conditions, and equipment calibration data.
A typical dwelling test takes between one and two hours, including setup and pack-down. Larger or more complex buildings take longer.
Common Fail Points
Most failures come down to gaps in the air barrier. These are the areas that cause problems again and again on sites we test:
- Service penetrations: Pipes, cables, and ducts passing through the air barrier without proper sealing. Every penetration needs an airtight seal, not just insulation stuffed around it.
- Window and door frames: Gaps between the frame and the structural opening. Expanding foam alone is rarely sufficient for airtightness. A continuous bead of sealant or airtight tape on the warm side is needed.
- Ceiling-to-wall junctions: Where plasterboard meets the top of the wall or the underside of the roof structure. If the air barrier is not continuous at this junction, warm air leaks into the roof space.
- Loft hatches: A common weak point. Standard loft hatches without compression seals and latches leak badly under test conditions.
- Electrical back boxes: Recessed sockets and switches on external walls create direct holes in the air barrier unless airtight back boxes or gaskets are used.
- Ground floor junctions: Where the floor meets the external wall. Beam-and-block floors with unfilled perimeter gaps are a frequent source of leakage.
When to Schedule Testing
Timing matters. Test too early and you cannot get a meaningful result. Test too late and remediation becomes expensive and disruptive.
The ideal point is when the building envelope is complete and the air barrier is continuous, but before final decoration and fitted furniture go in. In practical terms, this usually means:
- All external walls, roof, and ground floor are finished
- Windows and external doors are installed and sealed
- First-fix electrical and plumbing penetrations are sealed
- Plasterboard is up and taped (or skimmed)
- But kitchens, bathrooms, and final finishes are not yet installed
Some builders opt for an interim test at first-fix stage, before plasterboard goes up. This is not a compliance test, but it can highlight problems while the air barrier is still accessible and cheap to fix. We recommend this approach for any project targeting air permeability below 3 m³/h/m².
What to Do If You Fail
A failed test is not the end of the world, but it does need addressing. Here is a practical approach:
- Identify the leaks: A good tester will walk the building during depressurisation and use smoke pencils or thermal imaging to pinpoint where air is getting through. Ask your tester to do this as part of the test visit.
- Fix the worst offenders first: Service penetrations and junction details usually account for the bulk of leakage. Sealing these with appropriate tapes, mastics, or airtight membranes often brings the result within target.
- Retest: Once remediation is complete, the building is retested. Most sites pass on the second attempt if the leak identification was thorough.
Remediation costs are generally modest if caught early. Sealing tapes, airtight membranes, and mastic are inexpensive materials. The labour cost depends on access, which is why testing before kitchens and bathrooms are fitted saves money.
Getting Airtightness Right from the Start
The cheapest and most reliable way to pass a blower door test is to build airtightness into the construction process from day one. This means:
- Define the air barrier on drawings: Before work starts, draw a continuous red line around the building showing exactly where the air barrier sits. Every trade on site should know where it is and what they must not puncture without sealing.
- Brief all trades: Electricians, plumbers, and other trades need to understand that every hole they make through the air barrier must be sealed. This is a culture shift on many sites, but it is essential.
- Use the right products: Airtight tapes, membranes, grommets, and sealants designed for the purpose. General-purpose silicone and expanding foam are not adequate substitutes for proprietary airtightness products in most applications.
- Inspect before covering up: Check the air barrier at each stage before it gets hidden behind plasterboard, insulation, or finishes. Photographs are useful evidence if questions arise later.
Airtightness and Ventilation: Two Sides of the Same Coin
A tight building needs planned ventilation. Without it, you get condensation, mould, and poor indoor air quality. Part F of the Building Regulations sets out ventilation requirements, and these become more important as airtightness improves.
For new dwellings, the most common ventilation strategies are:
- Intermittent extract fans with trickle vents: The simplest and most common approach. Extract fans in wet rooms, trickle vents in all habitable rooms.
- Continuous mechanical extract ventilation (MEV): A central fan continuously extracts from wet rooms at a low rate, with trickle vents providing make-up air.
- Mechanical ventilation with heat recovery (MVHR): A balanced system that extracts stale air and supplies fresh air through a heat exchanger, recovering most of the heat. Increasingly popular on higher-performance builds.
The ventilation strategy should be decided early in design and coordinated with the airtightness approach. An MVHR system, for example, works best in buildings with air permeability below 3 m³/h/m². In a leaky building, the heat recovery is undermined by uncontrolled air paths.
Need airtightness testing for your project?
We carry out blower door testing across Bedfordshire, Cambridgeshire and Hertfordshire for new builds, extensions, and retrofit projects. We can also advise on airtightness detailing and help you get it right before test day.
Get in Touch